
Adding Features
After creating a project from template, to add features such as a customer management system. Classes will need to be added.
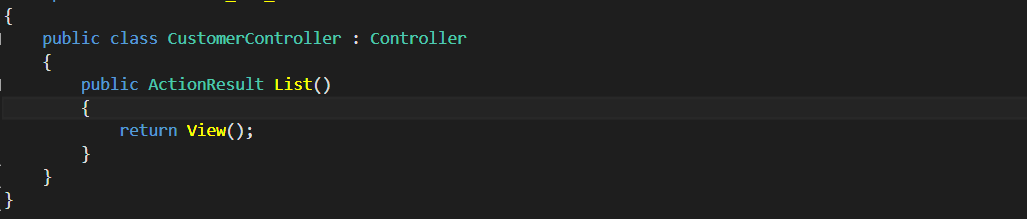
First step will be to create a CustomerController class, which will handle all tasks related to customer management. This can be accomplished by right-clicking on the Controllers folder then selecting Add → New Item. Use the CODE Framework: MVVM/MVC Controller item template with the file name CustomerController.cs (to match the instructions). The template includes a class with an Index() method which will be renamed to List().
In addition, a view model to display the data of the list of customers will be added in the Models Folder. (It is best practice to create a Customer method using the same name as the controller) Create a class in the Models folder with the file name ListViewModel using the CODE Framework MVVM/MVC View Model item template.
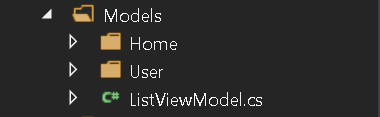
(Note the name: ListViewModel rather than CustomerListViewModel as it will be added to the Customer namespace, but any naming convention can be used.) The view model needs to store an enumerable list of customer information. This will be accomplished by using an observable collection (which allows WPF data binding, and works better than using a list or collection) that will put simple CustomerInformation objects into the collection.With the CustomerController, and ListViewModel defined in the first step, from these two code segments, there are a few interesting aspects. One aspect is the apparent simplicity of the syntax of the CustomerController class. (It is also syntax-compatible to ASP.NET MVC controllers). Controllers are basic classes that inherit from a Controller base class. In this case, this controller class is defined as part of the CODE Framework. So it is a different controller than the ASP.NET MVC controller class. However, since the syntax is compatible in many cases, the code from an ASP.NET MVC controller class cut and pasted into the WPF project will probably work without modifications. The ListViewModel class inherits from a ViewModel base class, which provides properties such as an implementation of INotifyPropertyChanged and a few other properties. The view model class is just a container for data with a bit of functionality which makes it easy to create an interface. You can use the CODE Framework ViewModel base class, or just about any other class for this. Setup is very straightforward since view models are meant to make coding easier.\

When using the basic ViewModel class a property that it implements is the IHaveActions interface. This interface defines an enumerable list of IViewAction objects. View actions are a core (but optional) concept in the CODE Framework. They are a simple way to define generic actions associated with a view, such as saving data or closing the view. They are fancy versions of WPF Command objects, and they in fact can be used interchangeably with commands (you can bind them to a button’s Command property for instance). They also provide a few extra features, such as the ability to define icons that go with those actions, or to create groups of actions, and so forth. In this example, a generic action that triggers closing the current UI when triggered (by clicking on a button or a menu item).
Since our example will show a list of customers, we’d better populate our customer list with some data. This would typically be done by calling a service or by talking to a middle tier or database of some kind. The CODE Framework has extensive features for this aspect of the application, but those are beyond the scope of this article. For now, a simple loop that creates dummy data will be used. Feel free to load your data from some other location if a data source is available.
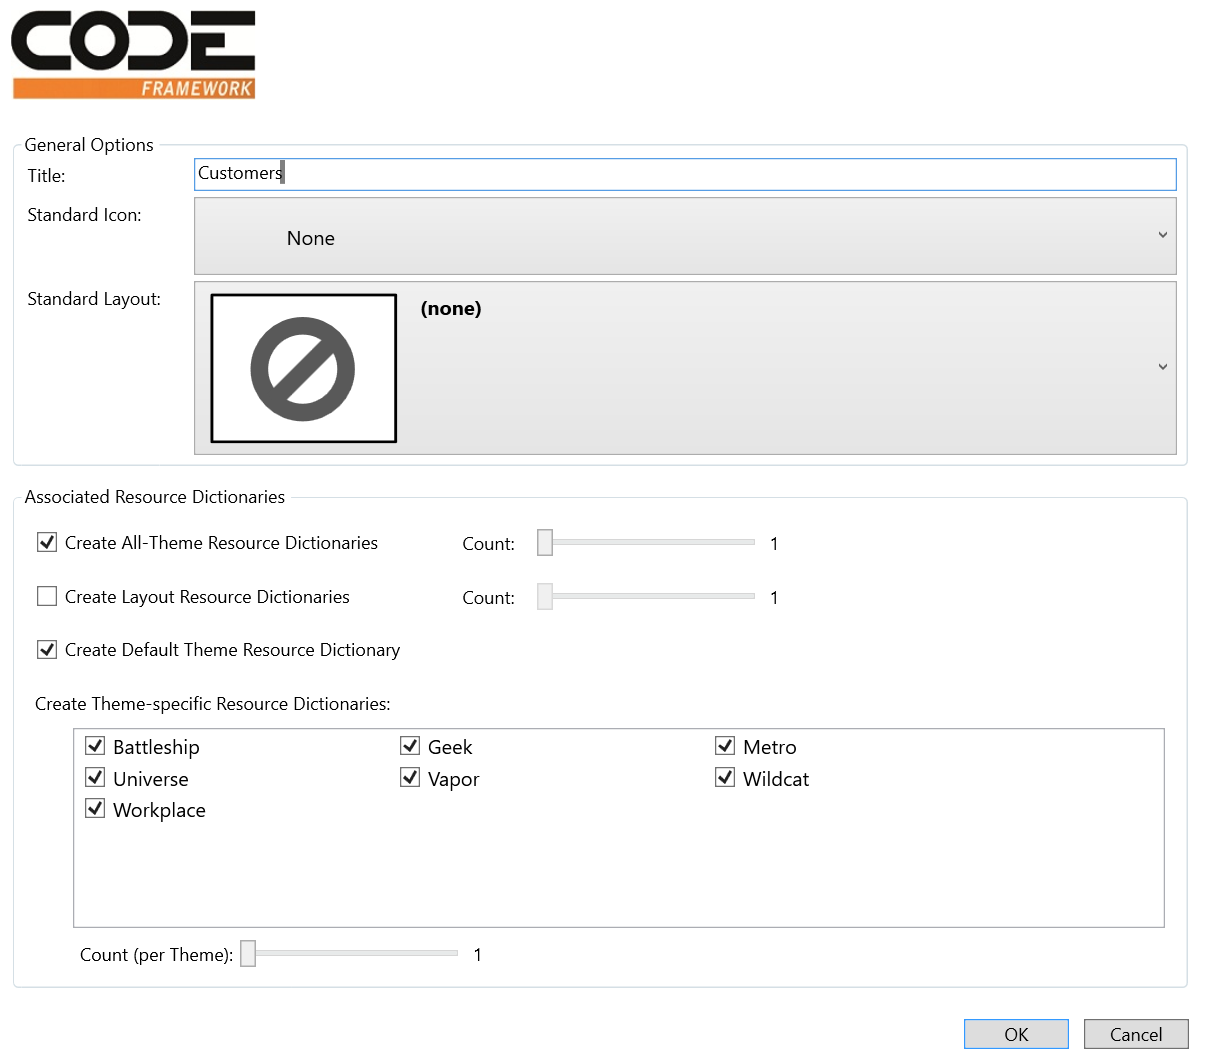
Now the view will be implemented. Add -> new folder with name Customer in the Views folder. Then, right-click and select Add → New Item and choose the CODE Framework WPF MVVM/MVC View template as the basis for your new item. Since our method in the controller is called List(), the default name for our view should be List.xaml (you could specify different names the same way ASP.NET MVC does). You could create your views in a number of different ways, but using the view template gives you a great starting point and it provides a few additional options through the dialog box shown in Figure.
A view in the CODE Framework can be a number of different things. For instance, a view could be a user control with a code-behind file. It could also be a stand-alone XAML file with no associated code (an option we particularly like, because it is not specific to WPF and can be reused across multiple environments). In fact, the CODE Framework supports pluggable view engines just like ASP.NET MVC (see a pattern emerge here?) so this system is completely customizable and additional view technologies can be added as needed.
In our case, we’ll go with a stand-alone XAML file. In addition to this XAML file, we can choose to create view-specific Resource Dictionaries the framework will load as needed. This includes both Resource Dictionaries that are always loaded (and are a great way to keep your view definition clean… which is not a characteristic you would attribute to most XAML files in most projects) and Resource Dictionaries that are loaded only for certain themes (support for themes/skins is a first-class feature in the CODE Framework). If you choose the same settings as shown in Figure 7, you will end up with a stand-alone XAML file as well as a Metro-specific Resource Dictionary (which will only be loaded if the application runs using the Metro theme) and a theme-neutral dictionary that will be loaded for all skins that do not have a specific theme Resource Dictionary (in other words: for all themes except Metro).
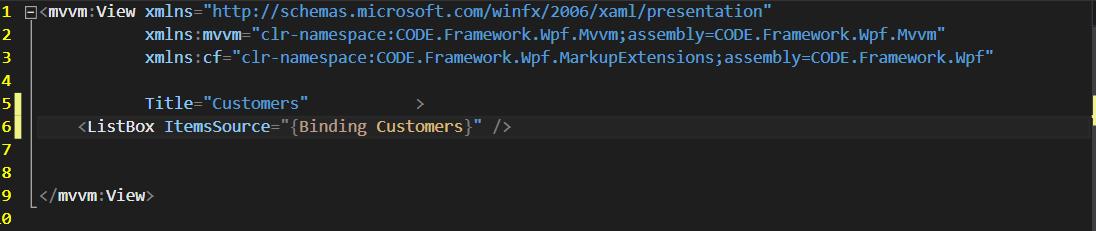
Since we want to display a list of customers, all we need to do in our view is add a ListBox that is bound to the Customers collection on our view model. (Note: You could, of course, also use other types of controls, such as a DataGrid, but as we will see below, ListBoxes aren’t a bad choice in XAML UIs.) Here is the code that goes with our view:
As you can see, this view definition is extremely simple. If we just ran this view, it wouldn’t look very good (although probably better than you’d expect as default theme and layout functionality kicks in) and we will improve that in a moment. However, you can already see a pattern emerge here: CODE Framework views (whether they are used within the overall CODE Framework setup or just as view objects in other MVVM frameworks) are simple and concise. This makes them easy and fast to create and it also makes them very reusable and easy to maintain. Not to mention that it isn’t error-prone. Even junior developers will be able to learn the required level of XAML very quickly.
Note that the root object of the view is a special View object provided by the CODE Framework. You could have also simply used a UserControl or something similar, and that would have been perfectly fine. However, if you use the view object, you gain some extra features, such as the ability to set a view Title and even associated icons. It also enables us to create a completely stylable view (which includes the ability to style the layout and not just attributes). If you are an observant XAML developer, you may have noticed that there is no further layout element inside the View object. If you start with a UserControl you would typically put a layout container inside that object (such as a Grid) and then add your further objects inside that element. Using the special view object, adding another layout container is unnecessary. In fact, a view by default uses a Grid as its default layout container, but that choice is completely stylable (similar to styling the layout panel of a ListBox).
If the babble in the last paragraph didn’t mean much to you, don’t worry! You shouldn’t have to know about these details unless you are already familiar with some of those concepts. All you need to really know is that the definition of the view above will produce a ListBox that uses up the entire space allocated to this view.
We are now ready to give our view a first trial run. The only thing missing is a way to launch our new view. We could add another Controller.Action(…) call in the application startup event, but the more elegant way is to add an item to the application’s menu. Using CODE Framework methodology, menus are collections of actions that can appear in the application in a variety of ways. For instance, using a conventional Windows skin (such as the default “Battleship” skin that is included in the framework), these actions show us as a menu across the top of the application. Using the Windows 8 Metro skin on the other hand, shows the same menu as a collection of Live Tiles. Other skins/themes may choose to show the menu in completely different ways, such as a Ribbon in an Office skin perhaps.
The main application menu is defined in the StartViewModel class, which is used by the home controller. (Check out the Start() method on the home controller which uses that view model to return a special type of view called a “Shell”, which is used as the main application window). The StartViewModel class has a convenient LoadActions() method in which the collection of actions gets populated. (Note: This method is called whenever a new user logs in, so one could easily change the menu for different users.) To add our new action, let’s add the following line of code somewhere after the TODO comment:
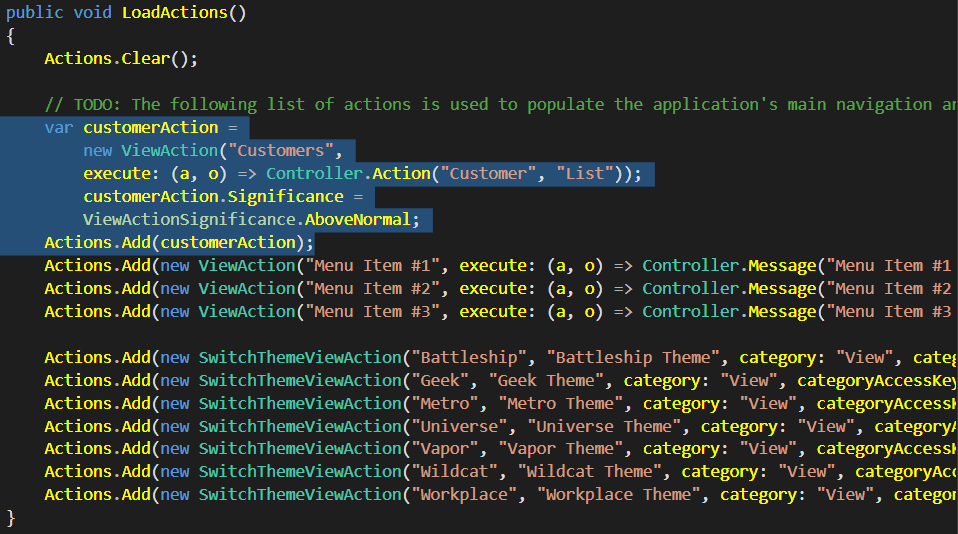
This creates a new ViewAction, assigns the “Customers” as the caption, and uses a lambda expression as the code that gets fired when the execute method is called. (This method accepts two parameters. The first is a reference to the action itself, and the second is a potential parameter, but we are not interested in those. All we do is fire a controller action.) We can also set additional parameters. We could set an associated icon for instance. We could even assign entire views and view models to each action, which could then be displayed in-place. Depending on the chosen skin, these types of settings may have completely different effects. Using the Metro skin, for instance, these views are displayed as the content of each Live Tile. Other skins can choose to use this information differently, or even ignore it altogether. In our current example, I simply set the Significance property to AboveNormal. The Metro skin interprets that by showing a Live Tile that is twice the normal size. (Note: There also are properties for categories and sub-categories, which allow you to assign menu items to specific parent menus.)
You can now press F5 to run the app. Once you are past the Login screen, you should see the application’s main menu which now includes the new menu item. Depending on the skin you chose as the default (you can change this default in App.xaml) you will see either Live Tiles or a conventional drop-down menu across the top of the screen. You can even switch between the two styles, clicking the theme menu items (by default, there is one menu item for each theme you include in your project). Click the new menu item, and the customer list should appear.
Let me point out a few interesting details. The customer list does not show any useful data at this point (and we will fix this momentarily), but it is already fully functional. Our view model got associated with the view (the controller takes care of that) and data binding made the data from the view model show up in the view. In addition, note that there is a Close button in this view (in fact, if you are looking at this in the Battleship theme, you have a Close button and a Close menu item under the File menu). This button is not in the view definition as such, but it is in the view model where we added it as a default action (see above). This is an important (although optional) concept in the CODE Framework. Standard UI elements such as standard buttons associated with a view do not have to be manually defined in the view but can simply be stuck in the Actions collection and the skins will then pick them up and display them in a standardized way. This could be either in buttons across the bottom of the form, or buttons in a toolbar, or a Ribbon, or a Menu, touch gestures, or a right-click menu, or Windows 8 Charms, or Windows Phone 7 menus, or… well, you get the idea. This concept makes the application extremely flexible and reusable. And best of all, once you understand this idea, it is extremely easy to use. Not to mention productive. After all, there is no faster way to define a UI than to not even have to define it.